

Table of Contents
- Identifying Your Sprinkler Head Type
- Tools Required for Sprinkler Head Adjustment
- How to Adjust the Spray Arc and Pattern
- Adjusting Spray Distance and Radius
- How to Clean Sprinkler Nozzles Properly
- Troubleshooting Uneven Lawn Watering
- Water Conservation and Smart Controller Integration
- Conclusion
Last Updated: August 7, 2026
Identifying Your Sprinkler Head Type
Before adjusting sprinkler heads, you need to know what you’re working with. Different types require different adjustment approaches.
The two main categories are rotors and spray heads. Rotors are larger, durable heads that rotate in a circular pattern, typically used in larger garden areas and commercial properties. Spray heads are smaller, stationary nozzles that spray in fixed patterns (full circle, half circle, or quarter circle), common in smaller garden beds and residential lawns.
You’ll also encounter pop-up sprinklers, which rise above ground when pressurised and sit flush when inactive, and riser-mounted heads on fixed vertical pipes. Pop-ups are standard in modern residential systems.
Adjustment mechanisms differ significantly. Rotors have arc adjustment screws and radius reduction screws controlling spray pattern and distance. Spray heads use nozzle inserts determining spray arc, with some offering trajectory adjustments.
Take five minutes to examine your sprinkler heads closely. Look for manufacturer markings, count adjustment screws, and note whether the head pops up or stays fixed. This prevents frustration and ensures you apply the right technique.
Tools Required for Sprinkler Head Adjustment
You need minimal tools to adjust sprinkler heads effectively.
A flat-head screwdriver is your primary tool, most arc and radius adjustment screws respond to a standard 6-8mm screwdriver. Keep a Phillips-head screwdriver on hand for older or specialty models. A multi-bit screwdriver saves carrying multiple tools.
A bucket is essential for testing. After adjusting, run your system and observe spray pattern and distance. A bucket in the spray zone measures water delivery and verifies coverage is even.
Access to your irrigation system’s main valve matters, turn the system on only when ready to test, never adjust while water flows. A measuring tape helps if achieving specific spray distances, though it’s optional for most homeowners.
WaterPro’s recommends keeping a small toolkit dedicated to irrigation maintenance: flat-head screwdriver, bucket, and tape measure in one place prevents hunting for tools when needed.
How to Adjust the Spray Arc and Pattern
The spray arc determines what portion of a circle your sprinkler head waters.
Identify the arc adjustment screw near the top or side of the unit, usually marked with degree symbols (0°, 90°, 180°, 270°, 360°). Turn the system on and observe the current spray pattern. Understanding your starting point helps you make intentional adjustments.
To reduce spray arc, turn the adjustment screw clockwise using your flat-head screwdriver. Small turns matter, a quarter turn often changes the arc by 15-30 degrees. After each adjustment, turn off the system, wait for pressure to drop, and observe the new pattern.
Common spray arc patterns include:
- Full circle (360°): Waters all directions equally
- Half circle (180°): Useful for heads against walls or property lines
- Quarter circle (90°): Ideal for garden bed corners
- Custom arcs (45°, 270°): Available on some models
The deflector shield on some heads redirects water flow, allowing you to aim spray away from hardscaping or towards specific areas. Adjust by hand or screwdriver depending on design.
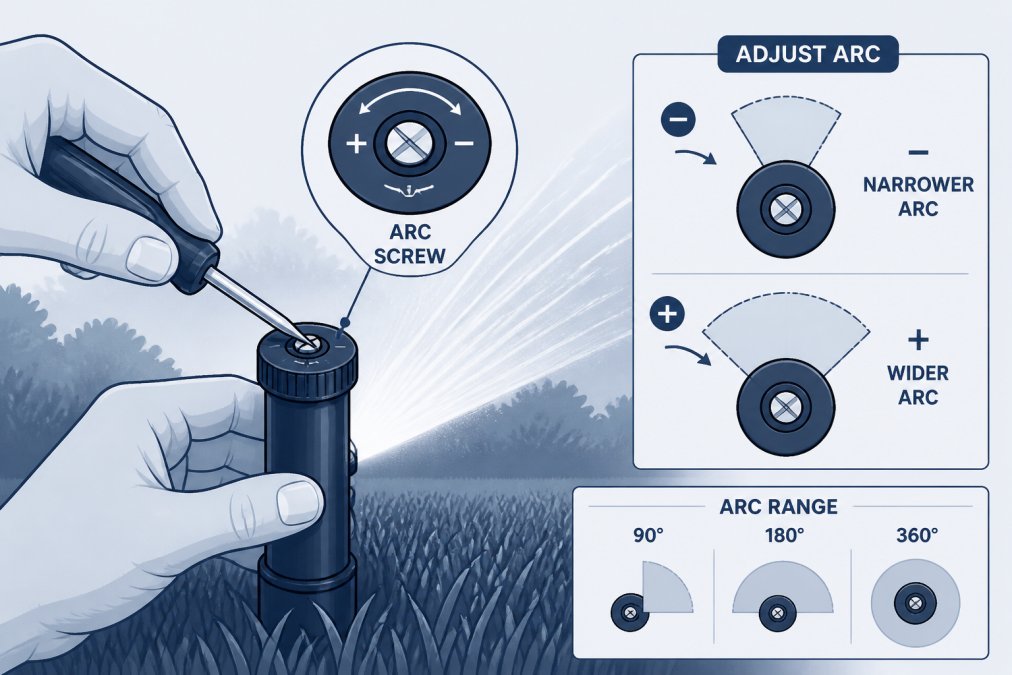
A common mistake is over-adjusting. Start with quarter turns, test, and adjust again if needed. This methodical approach prevents getting lost in the adjustment process.
If your head has a removable nozzle insert, swap inserts rather than adjusting screws for faster, more precise control. Full-circle, half-circle, and quarter-circle inserts are often available as replacements.
Adjusting Spray Distance and Radius
Spray distance, or radius, determines how far water travels from the sprinkler head. This is where many homeowners struggle because mistakes create obvious dry patches or overwatering.
Locate the radius reduction screw, usually smaller than the arc adjustment screw. On rotor heads, it’s typically on the side or bottom; on spray heads, it may be integrated into the nozzle assembly.
The radius reduction screw works counter-intuitively: turning clockwise usually reduces spray distance, while counter-clockwise increases it. This varies by manufacturer, so make a small clockwise turn, test, and observe. If distance increased unexpectedly, reverse direction next time.
Spray distance matters for coverage uniformity. If one head sprays 10 metres while a neighbouring head sprays 8 metres, you’ll have dry spots. The goal is head-to-head coverage, where each head’s spray reaches the next head’s location.
To test spray distance accurately, place buckets at various distances (2, 4, 6 metres, etc.) and run the system for a fixed time. Buckets collecting more water are within effective spray radius; those collecting little are beyond it.
Common spray distance ranges for residential heads:
- Spray heads: 1.5-4 metres
- Rotors: 4-10 metres
- High-pressure rotors: up to 15 metres
Make small adjustments, a quarter to half turn typically changes distance by 0.5-1 metre.
Head-to-head coverage is the gold standard for lawn irrigation. When each sprinkler’s spray reaches the next sprinkler’s location, you eliminate dry spots and achieve even water distribution.
How to Clean Sprinkler Nozzles Properly
Clogged nozzles are one of the most common reasons for uneven coverage and reduced spray distance. Sediment, mineral deposits, and debris accumulate inside the nozzle opening, restricting water flow.
Turn off your irrigation system before cleaning. Wait a minute or two for pressure to drop completely.
Remove the nozzle by twisting it out by hand. If stuck, wrap a cloth around it for better grip and twist slowly. Don’t force it, excessive force can crack the nozzle or strip threads.
Inspect the nozzle opening. You should see a clear passage when held to light. If partially blocked, cleaning will restore flow.
Use a soft brush or old toothbrush to scrub away loose debris. For stubborn mineral deposits, soak the nozzle in white vinegar for 30 minutes to an hour. Vinegar dissolves calcium and mineral buildup without damaging the nozzle. After soaking, brush again and rinse thoroughly.
For severely clogged nozzles, a small needle or wire can carefully clear the opening. Insert gently and work back and forth to dislodge blockages. Be careful not to enlarge the opening or create damage that changes the spray pattern.
Reinstall the nozzle by twisting it back into the head until snug. Don’t over-tighten, you want it secure but not forced.
Turn the system back on and observe the spray pattern and distance. A cleaned nozzle often restores spray to original specifications.
Never use high-pressure water or compressed air to clean nozzles. These methods can force debris deeper into the nozzle or crack the unit. Gentle brushing, vinegar soaking, and careful needle work are the safe approaches.
Troubleshooting Uneven Lawn Watering
Uneven coverage creates visible dry patches alongside overwatered areas. Systematic troubleshooting identifies the cause.
Observe your lawn during irrigation. Are dry patches in the same location every cycle, or do they move? Consistent dry spots suggest a mechanical problem with that specific head or zone. Moving dry spots suggest a pressure or flow issue affecting multiple heads.
Check for clogged nozzles first, as this is the most common cause. Follow the cleaning process for every head in the affected zone.
Next, verify arc and radius settings across all heads in the zone using your bucket method. If distances vary significantly, adjust shorter-distance heads’ radius reduction screws to match neighbours. Uniformity is essential.
Check for misaligned heads. Pop-up heads should sit flush when retracted and rise straight up when pressurised. Riser-mounted heads should be vertical. If one is leaning, tighten the base or adjust the riser.
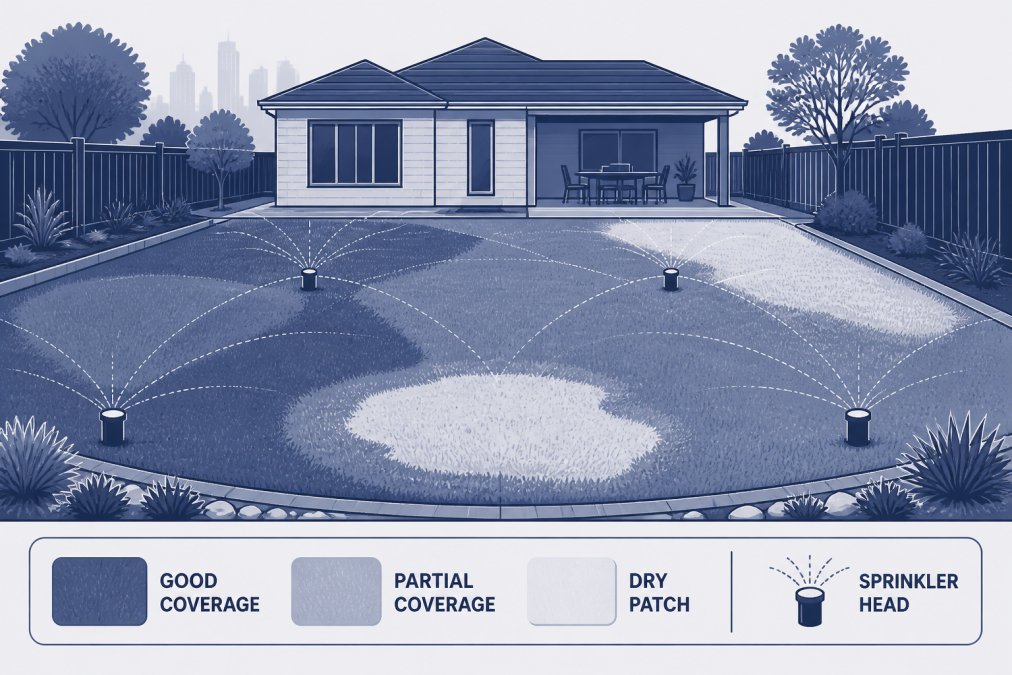
Water pressure problems can cause uneven coverage across an entire zone. If all heads spray shorter distances than they should, check that the main valve is fully open. Low pressure may indicate a leak in the supply line or clogged filter. Contact WaterPro’s if you suspect a system-wide pressure issue.
Runoff indicates water is flowing away rather than soaking into soil. This often happens on sloped ground or in areas with poor soil infiltration. Reducing spray distance or using multiple shorter irrigation cycles allows soil to absorb water more effectively.
Dry spots near property lines suggest arc adjustment issues. Widen the arc adjustment on affected heads to ensure full coverage.
Water Conservation and Smart Controller Integration
Adjusting sprinkler heads is about using water efficiently. Overwatering wastes water and money, and can damage your lawn by promoting disease.
Precipitation rate is the amount of water a sprinkler delivers per hour. Matching precipitation rates across a zone ensures even water distribution. If some heads deliver 25mm per hour while others deliver 15mm per hour, you’ll have uneven coverage.
Reducing spray radius on over-irrigating heads decreases water consumption without sacrificing coverage. A head spraying 8 metres when it only needs 6 metres wastes water in the overlap zone.
Smart irrigation controllers are increasingly popular in Australian homes. These devices monitor weather, soil moisture, and plant needs, automatically adjusting watering schedules. Many integrate with standard irrigation systems, allowing remote control via smartphone apps.
Smart controllers reduce water waste by up to 30%. They account for rainfall, so the system skips scheduled watering after heavy rain. They adjust for seasonal changes and use soil moisture sensors to water only when needed.
Integration with existing sprinkler heads is straightforward. Smart controllers replace your standard timer but work with existing heads. You still adjust arc and radius manually, but the controller handles when and how long the system runs.
For Melbourne homeowners, smart controllers align with water conservation priorities. Victoria’s urban water restrictions encourage efficient irrigation, and smart controllers help you comply while maintaining healthy gardens. WaterPro’s can advise on controller options and integration with your existing system.
Conclusion
Adjusting sprinkler heads is a straightforward task that delivers immediate results: better coverage, healthier lawns, and lower water bills. Whether fine-tuning arc and radius settings, cleaning clogged nozzles, or troubleshooting uneven coverage, the fundamentals remain the same: observe your system, make small adjustments, test, and repeat.
If you’re uncertain about your system’s design or encounter heads that don’t respond to standard adjustment techniques, professional support is worth considering. WaterPro’s has been helping Melbourne homeowners optimise their irrigation systems since 1990. Our qualified technicians can assess your setup, identify problem areas, and make adjustments that ensure your lawn receives the right amount of water in the right places. Book a consultation with WaterPro’s today and transform your garden’s irrigation performance.
Frequently Asked Questions
What is the little screw on top of a sprinkler head for?
The adjustment screw on top of your sprinkler head controls the spray arc and pattern. Turning it clockwise reduces the arc (narrows the spray), while counter-clockwise increases it. This screw lets you customise coverage without replacing the entire head, making it essential for fine-tuning how to adjust sprinkler heads to match your garden's layout and avoid watering pathways or neighbours' properties.
Can I adjust sprinkler heads without special tools?
Most sprinkler head adjustments require only a flat-head screwdriver, which you likely already have at home. Some radius adjustments may need a small wrench or pliers, but these are standard household tools. The best tools for sprinkler adjustment are simple and affordable, making this a DIY-friendly task for most homeowners. If you're unsure about your specific head type, WaterPro's can advise you on what you'll need.
Why is my sprinkler head spraying water onto the footpath or driveway?
This usually means your spray arc is set too wide or the spray distance is too great. Start by reducing the arc using the adjustment screw, turning it clockwise to narrow the pattern. If that doesn't solve it, check the radius adjustment to shorten the spray distance. Clogged nozzles can also cause erratic spray patterns. If adjustments don't help, a professional inspection may reveal a misaligned riser or pressure issue affecting how water is distributed.
How often should I clean sprinkler nozzles, and what causes clogs?
Clean nozzles at least twice per year, or more often if you have sediment-heavy water. Clogged filters in your irrigation system are often the culprit, as they allow debris to reach the nozzle. Mineral deposits and dirt particles block the small openings, reducing flow rate and creating dry spots. How to clean sprinkler nozzles properly involves removing the head gently, rinsing under running water, and using a small brush or soft wire to clear blockages without damaging the spray deflector.
This article was written using GrandRanker