
Table of Contents
- When to Winterize Your Irrigation System in Australia
- Step 1: Shut Off the Water Supply and Main Valve
- Step 2: How to Drain Sprinkler Lines Properly
- Step 3: Insulating Pipes and Backflow Prevention Assembly
- Step 4: Turn Off the Irrigation Controller and Zone Valves
- Irrigation Frost Protection Australia: Regional Climate Considerations
- Irrigation Winterization Cost Australia: DIY vs. Professional Service
- Inspecting for Leaks and Freeze Damage Before Winter
Last Updated: August 8, 2026
When to Winterize Your Irrigation System in Australia
Timing is critical for irrigation system winterization. Get it wrong and you’re looking at burst pipes, damaged backflow prevention assemblies, and costly repairs come spring. In Melbourne and surrounding regions, frost risk typically begins in late April and intensifies through June and July. Check your local Bureau of Meteorology data for historical frost dates in your area and aim to complete winterization by the end of May in southern Australia, earlier is always safer than later.
Water expands when it freezes. Any water left in your irrigation lines, sprinkler heads, or backflow prevention assembly will turn to ice, creating pressure that cracks PVC pipes, damages zone valves, and destroys expensive components. Professional irrigation contractors recommend treating winterization as a non-negotiable maintenance task, not an optional seasonal chore.
Set a calendar reminder for early May each year. Don’t wait until June; frost can arrive unexpectedly and catch you unprepared. Early winterization protects your investment.
Step 1: Shut Off the Water Supply and Main Valve
Locate your main shut-off valve, typically found where your water line enters the property or at the water meter. Turn the shut-off valve clockwise until it stops. Once closed, turn on one of your sprinkler heads or open a tap on the system to release residual pressure. This depressurization step prevents water from being forced back into your lines during draining.
Next, locate your irrigation system‘s main isolation valve, which sits between your water meter and the controller. Turn this clockwise as well. If you’re unsure where these valves are located, WaterPro’s technicians can identify them during a site inspection.
After both valves are closed, leave the system depressurized for at least 30 minutes. This allows trapped water to settle and makes the next drainage steps significantly more effective.
Shut-off valves are your first line of defense. A properly closed main valve means no water can re-enter your system during winterization, protecting every component downstream.
Step 2: How to Drain Sprinkler Lines Properly
Draining your sprinkler lines is the most critical phase of irrigation system winterization. There are two primary methods: manual draining and the blow-out method using compressed air.
Manual Draining Method
Manual draining works well for smaller systems and is the safest option if you lack access to an air compressor. Open all drain valves on your irrigation system, beginning with the valve closest to your main shut-off and working outward. These drain valves, typically located at the lowest points of your system, allow gravity to pull water out naturally.
Open each drain valve slowly and leave them open for at least 2-3 hours, or overnight if possible. While water drains, open your irrigation controller and manually activate each zone for 30 seconds to force remaining water out of zone valves and sprinkler heads. Repeat this process for every zone.
Check your backflow prevention assembly for small drain ports and open these as well. Water pooling inside a backflow preventer will freeze and damage the internal mechanism. Manual draining typically takes 4-6 hours depending on system size, though it cannot remove all water, some always remains in low spots and sprinkler heads.
Automatic Draining and Blow-Out Method
The blow-out method uses an air compressor to force water out of every line and component. You’ll need an air compressor capable of delivering 80-100 PSI and a quick-connect adapter that fits your irrigation system’s main line. Never exceed 100 PSI; higher pressure can rupture PVC pipes or damage sprinkler heads.
Connect the compressor to your main irrigation line after closing the shut-off valve. Activate your irrigation controller and set it to run each zone individually for 20-30 seconds. As each zone runs, compressed air forces water out through the sprinkler heads and zone valves. Work through every zone systematically until you see air only.
The blow-out method is significantly more effective than manual draining because it removes water from sprinkler heads and deep within the system. However, it requires professional-grade equipment and carries risk if performed incorrectly. Many homeowners hire professional technicians for this step. WaterPro’s offers blow-out services as part of comprehensive irrigation system winterization.
Do not attempt a blow-out without proper equipment and training. Excessive air pressure can burst PVC pipes, crack zone valves, or damage sprinkler heads. When in doubt, hire a professional.
Step 3: Insulating Pipes and Backflow Prevention Assembly
After your system is drained, protecting exposed components from freezing temperatures becomes your focus. Foam pipe insulation is the standard solution. Measure your exposed pipe diameter (typically 20-32mm for residential systems) and purchase matching foam insulation. Wrap all above-ground pipes, paying special attention to areas where pipes run along fences, through garden beds, or under eaves.
For your backflow prevention assembly, which typically sits near your water meter, wrap the entire unit with foam insulation or a purpose-built backflow preventer cover. These components contain internal check valves and seats that are extremely sensitive to freezing. Even brief exposure to temperatures below -2°C can cause permanent damage.
Don’t forget zone valves, which are often overlooked during winterization. Wrap each zone valve with foam insulation, ensuring complete coverage. If you have an irrigation controller mounted outdoors, cover it as well.
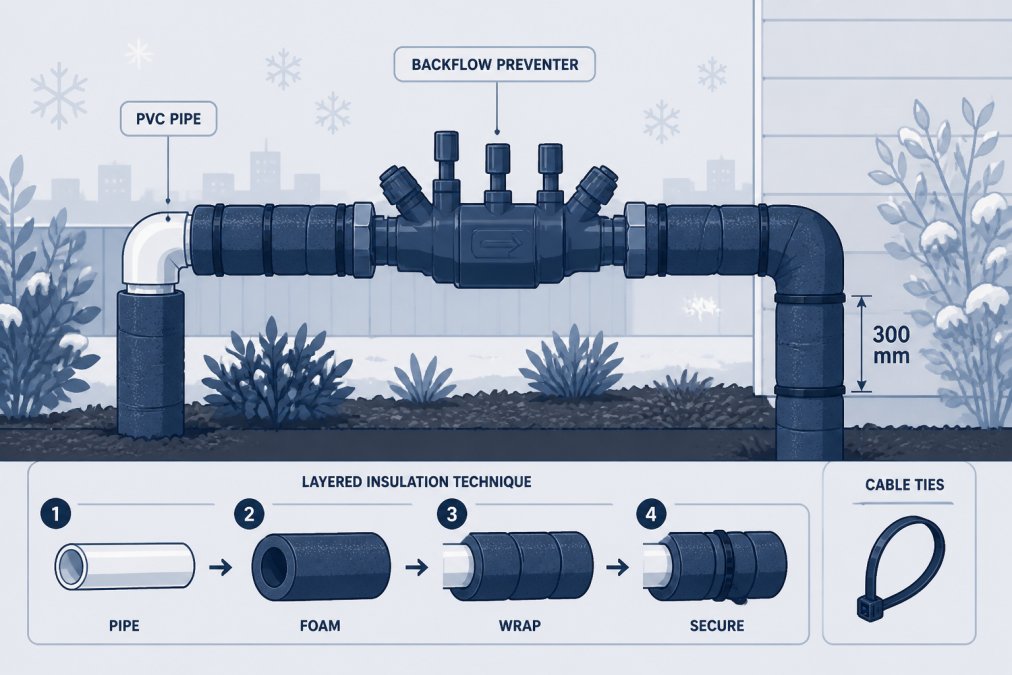
The investment in insulation is minimal compared to the cost of replacing frozen components.
Step 4: Turn Off the Irrigation Controller and Zone Valves
Locate your irrigation controller, typically a weatherproof box mounted on an exterior wall or inside a garage, and turn it off completely. Most controllers have a master switch or power button; switch it to the OFF position. If your controller has a battery backup system, remove the batteries as well to prevent any accidental zone activation during winter.
Next, manually inspect each zone valve on your system. Some zone valves have manual override switches; if yours do, turn them to the OFF or CLOSED position. This provides a secondary safeguard against accidental water flow.
If your system has a pressure regulator, ensure it’s also protected with foam insulation. Regulators contain internal springs and seals that freeze easily. Document the location and settings of your pressure regulator before winter; you’ll want to verify it’s still functioning correctly when you restart your system in spring.
A dormant controller and closed zone valves mean zero risk of water flowing through your system during the coldest months. This simple step eliminates one of the most common causes of winter irrigation damage.
Irrigation Frost Protection Australia: Regional Climate Considerations
Australia’s climate varies dramatically by region, and your winterization strategy must reflect your local conditions. Melbourne experiences regular hard frosts, with temperatures frequently dropping below 0°C from June through August. Brisbane’s climate is milder, with frost risk concentrated in July and August. Perth and Adelaide fall somewhere in between.
Understanding your local frost line, the depth at which soil freezes solid, is essential for protecting buried pipes. In Melbourne, the frost line typically reaches 100-150mm depth during severe winters. Any irrigation pipes buried shallower than this depth face freeze risk. If you’re unsure of your pipe burial depth, WaterPro’s can inspect your system and identify vulnerable sections.
Coastal properties often experience milder winters than inland locations at the same latitude. If your property is within 5km of the coast, you may have a slightly longer winterization window. Conversely, properties at elevation or inland experience harsher conditions and require earlier winterization.
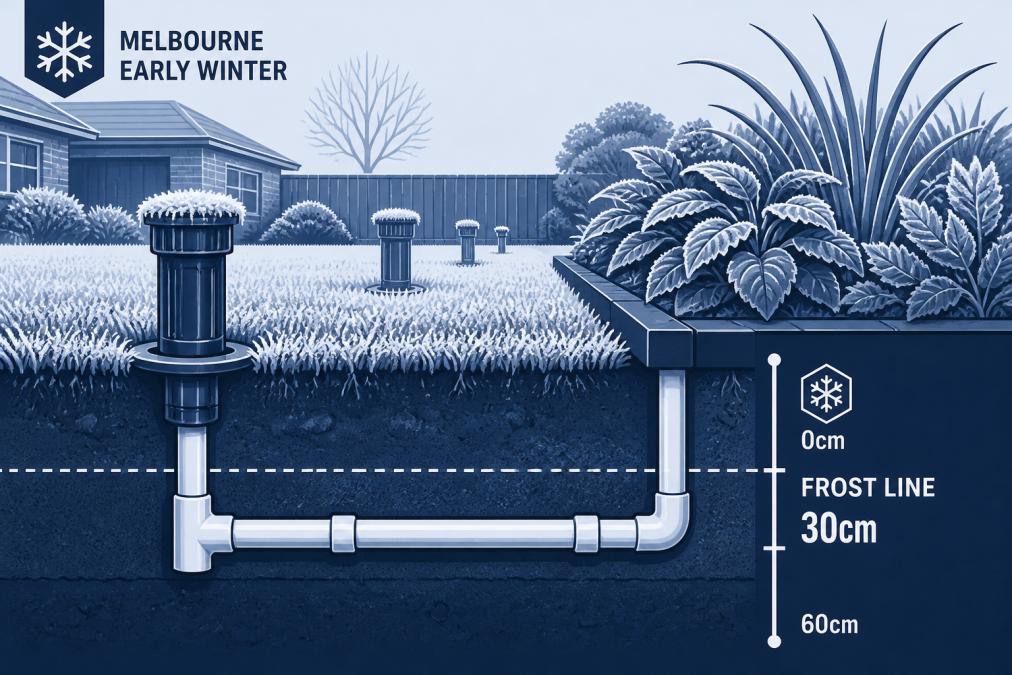
Document your local frost patterns over several years. This data becomes invaluable for timing future winterization efforts. When in doubt, consult with local irrigation professionals who understand regional weather patterns intimately.
Irrigation Winterization Cost Australia: DIY vs. Professional Service
The decision between DIY winterization and hiring professional technicians depends on your system’s complexity, your comfort level with technical tasks, and the true cost of potential mistakes.
DIY Winterization Approach
A DIY winterization using the manual draining method requires minimal investment. You’ll need foam pipe insulation (typically $2-5 per metre), cable ties ($10-20 for a pack), and basic tools you likely already own. Total material cost for a typical residential system ranges from $40 to $150. The time investment is substantial, expect 6-10 hours for a complete manual drain and insulation job.
The primary risk with DIY winterization is incomplete drainage or improper technique. Leaving water in just one zone valve or sprinkler head can result in freeze damage costing hundreds of dollars to repair.
Professional Winterization Service
Professional irrigation contractors bring specialized equipment, system knowledge, and insurance protection. They perform blow-out drainage, which removes significantly more water than manual methods, and they inspect your entire system for existing damage or vulnerabilities. Professional winterization typically takes 2-4 hours depending on system size.
WaterPro’s offers comprehensive winterization services including system inspection, blow-out drainage, insulation installation, and a spring restart checklist.
Cost-Benefit Analysis
For a straightforward residential system with clear access to all components, DIY winterization makes economic sense if you’re confident in your technical abilities. However, if your system is complex or if you value the insurance of professional expertise, hiring a contractor is justified. The cost of one freeze-damaged zone valve or backflow preventer assembly often exceeds the cost of professional winterization.
Inspecting for Leaks and Freeze Damage Before Winter
Before you finalize your winterization, conduct a thorough system inspection to identify existing damage or vulnerabilities. Start by walking your entire property and tracing your irrigation lines. Look for visible cracks, loose connections, or areas where pipes have shifted or settled.
Check your backflow prevention assembly for visible leaks. A small drip during normal operation might seem minor, but freezing will expand that drip into a crack. Similarly, inspect all zone valves and the pressure regulator for moisture or corrosion.
Open your irrigation controller and review the system diagram or wiring schematic, if available. If you don’t have documentation, sketch a simple diagram during your inspection. This becomes invaluable if problems arise during winter.
Test each sprinkler head by manually activating its zone. Listen for unusual sounds, watch for water spraying in unexpected directions, and check whether all heads in a zone activate. A malfunctioning sprinkler head discovered before winter can be replaced or repaired before winterization.
Finally, verify that all drain valves open and close smoothly. Corroded or stuck drain valves are common problems that become apparent only when you try to use them. If a drain valve won’t open, apply penetrating oil and wait 24 hours before trying again.
Winterizing your irrigation system is the single most important maintenance task you’ll perform each year. Whether you choose to tackle winterization yourself or hire professional technicians, the key is starting early and following through completely. At WaterPro’s, we’ve spent over three decades helping Melbourne properties protect their irrigation systems through Australian winters. If you’re uncertain about any aspect of winterization or want professional guidance tailored to your specific system, our qualified technicians are ready to help. Book a winterization inspection today and head into winter with complete confidence.
Frequently Asked Questions
Do I need to winterize my irrigation system in Australia?
Yes, if you live in regions where temperatures drop below freezing, particularly in Melbourne and inland areas. When water freezes inside PVC pipes and zone valves, it expands and causes pipe bursts and system damage. Even mild-climate areas benefit from seasonal shutdown to prevent freeze damage and extend system integrity. Proper irrigation system winterization protects your investment and ensures reliable operation when spring arrives.
What's the best time to winterize your sprinkler system in Australia?
Winterize before the first hard frost, typically March to April in Melbourne and inland regions. Check your local frost dates and act early, waiting until after frost damage occurs is costly. Shut down your irrigation controller and drain all water from PVC pipes, zone valves and backflow prevention assembly before temperatures consistently drop below 5°C. This timing prevents freeze damage and ensures system integrity through winter.
How much does irrigation winterization cost in Australia?
DIY winterization costs $100-300 for basic materials like foam insulation and drain plugs. Professional winterization services vary depending on system size, complexity, and your location. Factors include whether you need blow-out method equipment, compressed air rental, or additional insulation. For accurate pricing tailored to your system, contact WaterPro's for a free assessment. Professional service protects against costly freeze damage and ensures thorough system inspection.
What are the signs of frost damage in irrigation pipes?
Look for visible cracks or splits in PVC pipes, leaking water at joints, reduced water pressure, or sprinkler heads that don't activate. Freeze damage often appears as white stress marks on pipes or soft spots in insulation foam. If you notice these signs after winter, stop using the system and have it inspected professionally before restarting. Early detection prevents further damage and helps you avoid replacing entire zones or the backflow prevention assembly.
This article was written using GrandRanker