
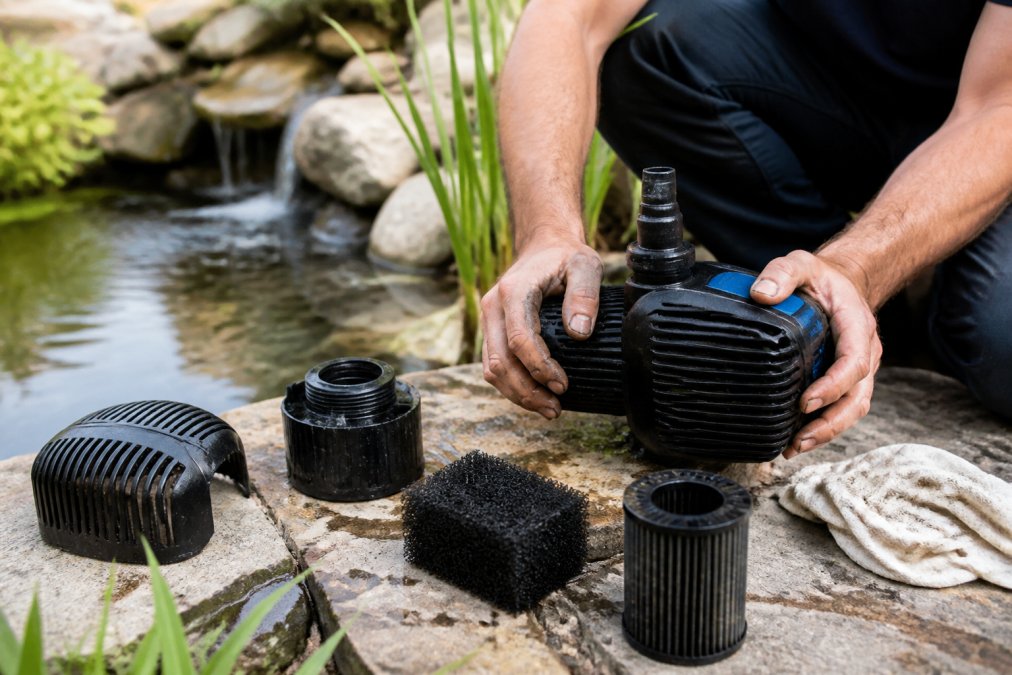
Table of Contents
- Why Pond Pump Maintenance Is Essential
- How Often to Clean Your Pond Pump: Cleaning Frequency Guide
- Step-by-Step Pond Pump Cleaning Process
- Best Tools for Pond Pump Maintenance
- Inspecting the Impeller and Housing
- Troubleshooting Pond Pump Flow Issues
- How to Replace a Pond Pump Impeller
- Seasonal Maintenance and Winterisation
Last Updated: August 19, 2026
Why Pond Pump Maintenance Is Essential
A garden pond pump is the heart of your water circulation system. Without regular maintenance, it will clog with debris, lose flow rate, and eventually fail, leaving your pond stagnant and your filtration system useless. Within weeks of neglect, algae and sediment accumulate inside the intake screen, the impeller becomes choked with organic matter, and the pump overheats and burns out prematurely.
At WaterPro’s, we’ve seen countless pond systems fail because owners waited too long between cleanings. A functioning pond pump keeps water oxygenated, supports beneficial bacteria in your filtration system, and prevents the stagnation that leads to mosquito breeding and foul odours. The real difference between a thriving pond and a maintenance nightmare comes down to consistent cleaning.
How Often to Clean Your Pond Pump: Cleaning Frequency Guide
The frequency of pond pump cleaning depends on your pond’s bio-load, the amount of organic matter entering the system. Most ponds need cleaning every 4 to 8 weeks during the growing season. If your pond has fish, heavy algae growth, or sits beneath deciduous trees, clean it every 2 to 4 weeks. A lightly stocked ornamental pond might stretch to 8 to 12 weeks between cleanings.
During summer months when water temperatures rise and algae blooms accelerate, increase frequency to every 3 to 4 weeks. In cooler climates, you may reduce maintenance or shut down the pump entirely during winter dormancy.
Watch for warning signs that cleaning is overdue. If water flow rate drops noticeably, the pump sounds strained, or the intake screen is visibly clogged, clean immediately rather than waiting for your scheduled maintenance window.
Check your intake screen weekly during peak season. A 30-second visual inspection prevents most catastrophic failures. Visible debris buildup means cleaning day has arrived.
Step-by-Step Pond Pump Cleaning Process
Cleaning your pond pump is straightforward if you follow a logical sequence. The process typically takes 30 to 60 minutes depending on how much buildup you’re dealing with.
What You’ll Need Before You Start
Gather these items before you begin:
- Bucket or basin for small parts
- Soft-bristled brush or old toothbrush
- Clean cloth or sponge
- Screwdriver set (flathead and Phillips)
- RCD (residual current device) safety switch for electrical testing
- Replacement gasket and seal kit
- Small parts container to prevent losing screws
- Hose with gentle water pressure for rinsing
- Gloves (protective and waterproof)
- Pond water in a separate container to rinse components
Do not use harsh chemicals or high-pressure washers on pump parts, as these damage seals and gaskets.
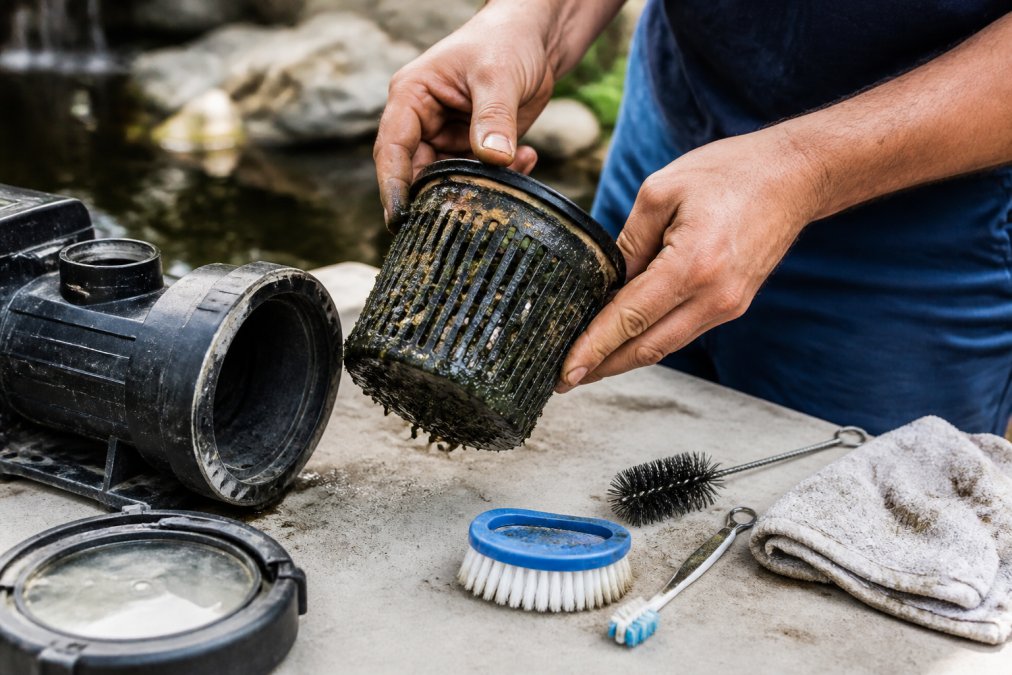
The Cleaning Steps
Step 1: Switch Off Power and Test Safety (5 minutes)
Turn off the pump at the main switch. Wait 5 minutes for any residual charge to dissipate. Use an RCD tester to confirm the power is safely disconnected.
Step 2: Disconnect the Pump (5 minutes)
For submersible pumps, gently lift the unit from the pond. For external pumps, close the inlet and outlet valves first, then disconnect the hoses.
Step 3: Remove the Intake Screen (5 minutes)
The intake screen is usually held by a grommet or clip. Unscrew or unclip it carefully.
Step 4: Clean the Intake Screen (5 minutes)
Rinse the screen under clean running water. Use a soft brush to dislodge algae and sediment. For stubborn buildup, soak it in pond water for a few minutes, then brush again.
Step 5: Inspect the Pump Housing (5 minutes)
Look inside the housing where the intake screen was. Use a soft cloth to wipe away loose debris. For calcium buildup, a gentle brush works. If debris is stuck, soak the housing in pond water for 10 minutes.
Step 6: Check the Impeller (10 minutes)
The impeller is the spinning component that moves water. Remove the pump cover or access panel (check your manual). Inspect the impeller for debris wrapped around the shaft. Gently remove any tangled material. Spin the impeller by hand, it should rotate freely with no grinding sounds or resistance.
Step 7: Reassemble and Test (15 minutes)
Replace the gasket and seal if they show wear. Reinstall the intake screen. Reconnect all hoses and fittings. Refill any water that spilled during disconnection. Switch the pump back on and listen for normal operation.
The most common mistake is reassembling too quickly without checking the gasket. A failed seal causes leaks within days. Always inspect and replace gaskets during maintenance.
Best Tools for Pond Pump Maintenance
Investing in the right tools makes maintenance faster and safer. A soft-bristled brush is essential, stiff brushes damage the impeller and housing surfaces. An RCD safety switch is non-negotiable and prevents electrocution if the pump develops a fault.
Keep a replacement gasket and seal kit on hand. These wear out and fail without warning. Most kits cost £15 to £30 and include everything you’ll need. A bucket with gradations helps you measure water loss and refill amounts accurately. WaterPro’s stocks quality replacement kits and maintenance supplies, ensuring you can service your pump without delays.
Inspecting the Impeller and Housing
The impeller is where most problems originate. During inspection, look for visible cracks in the impeller blades, discolouration from overheating, or material wrapped around the shaft. A cracked impeller must be replaced.
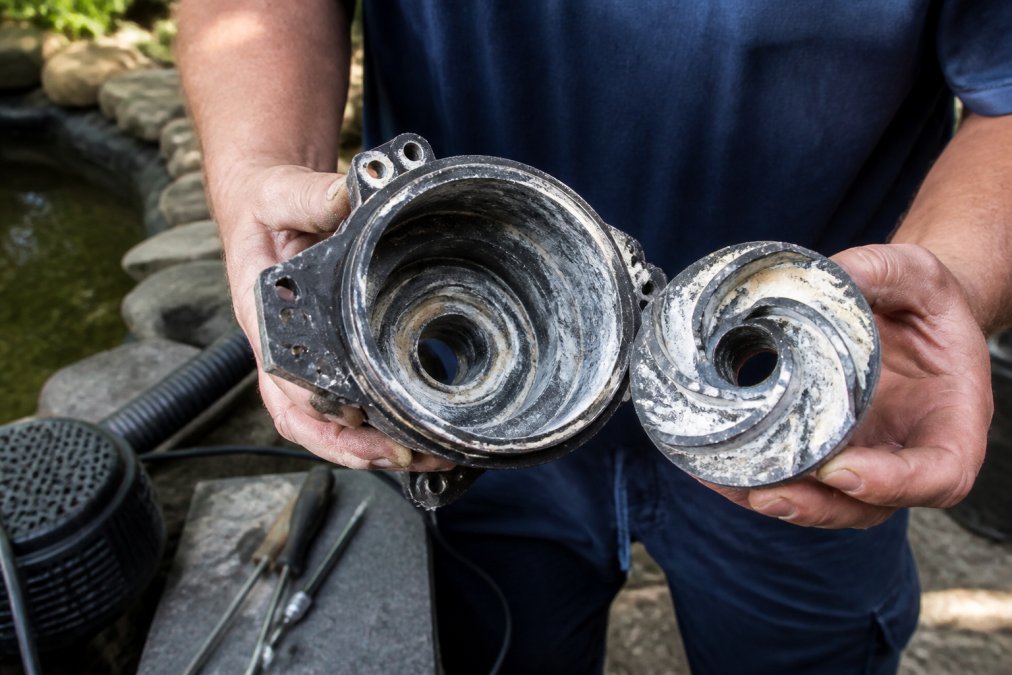
Scale buildup is common in hard water areas. For light scale, a soft brush removes it. For heavy buildup, soak the component in pond water mixed with a small amount of white vinegar for 30 minutes, then brush gently.
The housing should be smooth and free of cracks. Small cracks allow water to leak internally, reducing pressure and efficiency. Spin the impeller by hand after cleaning, it should rotate freely with no grinding sounds. Check the seal around the impeller shaft; if it’s cracked, discoloured, or hard to the touch, replace it immediately.
Never force the impeller to spin during inspection. Excessive force breaks internal components and voids the warranty. If it won’t spin freely after cleaning, stop and seek professional help.
Troubleshooting Pond Pump Flow Issues
Low flow rate is the most common problem, usually caused by something blocking the intake or impeller. Start by checking the intake screen, a blocked screen reduces flow rate by 50% or more.
Next, verify that the pump is running. Listen for the motor sound. If it’s silent, check the power supply and RCD switch. If the pump is running but flow is weak, the impeller may be clogged.
Check your pond volume against the pump’s rated capacity in litres per hour (LPH). If your pump is undersized for your pond, it will never achieve the expected flow rate. Leaks around the pump housing indicate a failed gasket or seal that must be replaced.
If the pump makes grinding or squealing sounds, the impeller may be damaged or the motor bearing is failing. Stop running it immediately. Air in the system creates flow problems; if the pump makes a sucking sound at the intake, the inlet may be above the water level or there’s a leak in the intake line.
According to Australian Standard AS/NZS 60950-1 for electrical safety, any pump showing electrical faults must be taken out of service immediately and professionally inspected before reuse.
How to Replace a Pond Pump Impeller
Replacing the impeller is a job most owners can handle. First, disconnect power and test for safety using your RCD device. Remove the pump from the pond and place it on a clean, dry surface.
Locate the impeller access panel on the pump housing and unscrew it carefully. Note the orientation of the old impeller before removing it, the blades face a specific direction. Remove the retaining clip or screw holding the impeller to the shaft and gently pull the impeller straight off.
Slide the new impeller onto the shaft in the same orientation as the original. Ensure it sits fully on the shaft with no gap. Reinstall the retaining clip or screw firmly but do not over-tighten. Spin the impeller by hand to confirm it rotates freely.
Replace the access panel gasket if it shows wear. Reinstall the panel and tighten the screws evenly in a cross pattern. Reconnect the pump to the pond and test it. WaterPro’s stocks replacement impellers for most pump models.
Seasonal Maintenance and Winterisation
Seasonal changes require different maintenance approaches. Summer demands frequent cleaning because heat accelerates algae growth. Check the intake screen weekly and increase cleaning frequency to every 3 to 4 weeks.
As autumn arrives, prepare for winter shutdown if you live in a cold climate. Drain the pump completely to prevent ice damage. Disconnect the pump and store it indoors in a dry location.
Spring is the ideal time for a thorough inspection before returning to full operation. Check all gaskets and seals for damage and replace any that show cracks or hardening. When restarting the pump after winter shutdown, prime it with pond water before switching on.
Guidance from the Australian Environmental Protection Authority on water conservation recommends reducing pump run times during winter months to lower energy consumption. Energy efficiency improves with regular maintenance, a clean pump uses less electricity than a clogged one.
Maintaining your garden pond pump is straightforward when you understand what to check and when. Consistent cleaning prevents emergencies. If you’re uncertain about any step or encounter a problem you can’t solve, professional servicing is always an option. WaterPro’s offers comprehensive pond pump maintenance and repair services tailored to your system’s specific needs. Our qualified technicians can diagnose flow issues, replace worn components, and ensure your pump operates efficiently year-round. Check WaterPro’s service availability and book a maintenance appointment to keep your pond system in peak condition.
Frequently Asked Questions
How can I stop my pond pump from clogging up?
Clogging occurs when debris, algae, and calcium buildup block the intake screen and impeller. Clean or replace your intake screen every 2-4 weeks depending on debris levels. Install a pre-filter to catch larger particles before they reach the pump. Check water chemistry regularly, high calcium content accelerates scale formation. Empty skimmer baskets weekly and remove fallen leaves promptly. During summer months when bio-load increases, inspect the pump more frequently. A well-maintained filtration system reduces debris entering the pump significantly.
Does a pond pump need to run 24 hours a day?
Yes, running your pond pump continuously is essential for maintaining water circulation, oxygen levels, and preventing stagnation. 24/7 operation ensures consistent aeration, which keeps beneficial bacteria active and reduces algae growth. However, during winter months in cold climates, you may need to adjust operation or winterise your system. Check your pump manufacturer's specifications, some submersible and external pumps are designed for continuous duty. Running your pump around the clock also maintains consistent flow rate and prevents sediment settling on the pond floor.
How often should I service my garden pond pump?
Inspect your pond pump maintenance schedule every 2-4 weeks during the growing season. Clean the intake screen and pre-filter every 2 weeks if your pond has high debris levels; monthly if debris is minimal. Perform a full inspection of the impeller, shaft, and gasket seals quarterly. Check for wear and tear, calcium buildup, and signs of overheating. In winter, reduce inspection frequency to monthly unless you're running the pump year-round. Professional servicing annually ensures electrical safety, proper RCD function, and optimal flow rate for your pond volume.
What should I do if my pond pump isn't flowing properly?
Low flow rate usually indicates clogging or impeller damage. First, check the intake screen for debris, this is the most common cause of troubleshooting pond pump flow issues. Clean or replace the screen and pre-filter. Inspect the impeller for scale, calcium buildup, or physical damage. Verify the pump is properly primed and water level is adequate for your pond volume. Check electrical connections and ensure the RCD is functioning. If flow remains poor after cleaning, the impeller may need replacement. Examine the shaft for corrosion or wear and tear. If problems persist, contact a qualified technician to assess mechanical filtration and pump capacity.
How do I know if my pond pump impeller is broken?
A broken impeller causes reduced flow rate, unusual noise, or complete pump failure. Signs of wear and tear include grinding sounds, vibration, or water leaking from the housing. Remove the pump and visually inspect the impeller for cracks, chips, or bent blades. Check the shaft for corrosion or damage. If the impeller is damaged, replacement is necessary, this is a common maintenance task. A magnetic drive impeller may appear stuck if scale has built up; try cleaning before assuming it's broken. If the pump runs but produces no flow, the impeller is likely damaged and requires replacement.
What's the difference between submersible and external pond pumps?
Submersible pumps sit inside the pond, drawing water directly and reducing priming issues. They're quieter and take up less space but are harder to access for maintenance. External pumps sit outside the pond and push water through the system, they're easier to service and typically more powerful for larger pond volumes. External pumps require proper priming and are more visible. Both types need regular intake screen cleaning and impeller inspection. Choose based on your pond volume, desired flow rate, and maintenance preference. Submersible pumps suit smaller ponds; external pumps handle larger volumes and complex filtration systems better.
Can I clean my pond pump myself, or do I need a professional?
Basic cleaning, removing debris, cleaning the intake screen, and inspecting for obvious damage, is straightforward for homeowners. However, electrical safety is critical; always switch off the RCD and disconnect power before working on the pump. If you're uncomfortable with electrical work or need to replace components like the impeller, gasket seals, or shaft, hire a qualified technician. Professional servicing ensures proper reassembly, electrical safety testing, and identification of wear and tear you might miss. For complex issues or if your pump is under warranty, professional maintenance protects your investment and ensures safe operation.
This article was written using GrandRanker